OCEAN BREEZE

a versatile free crochet hat pattern
messy bun/pony tail options included in pattern

Introduction: The crochet stitch pattern consists of the Herringbone stitch and the front post double crochet stitch. The front post double crochet stitch separates each Herringbone around the hat which in return gives a lovely textured pattern with little fuss. You also have the option to leave an opening for a messy bun or pony tail.
The hat begins being made at the the brim and finishes at the crown.
Once the first few rows are completed, the hat pattern repeats it's self through out, making it an easy pattern to make once you get going.
Once the first few rows are completed, the hat pattern repeats it's self through out, making it an easy pattern to make once you get going.

Herringbone meaning: a pattern consisting of columns of short parallel lines, with all
the lines in one column sloping one way and all the lines in the next
column sloping the other way so as to resemble the bones in a fish, for
example as used in the weave of cloth. See bottom of post for a you tube video of the herringbone stitch.

Size, small to med. The pattern is a 6 stitch repeat, to make a large hat, add a count of 6 ch for a total of 54 chain and adjust round count as needed.
Materials needed:
Materials needed:
5 mm hook (US H-8)
10 ply (US Aran weight) yarn
Approx 50 gm's of each color
Experience: Beginner +
Time: Approx 2 hours +
Stitches used: US terminology
Ch = chain
Sl st = slip stitch
Sc = single crochet
Hdc = half double crochet
Dc = double crochet
Fpdc = front post double crochet
Sc = single crochet
Hdc = half double crochet
Dc = double crochet
Fpdc = front post double crochet
Dec = decrease
Shell = (2 dc, ch 2, 2 dc = shell made)
Half Shell = (1 dc, ch 2, 1 dc = half shell)
Fpdc dec = work 1 fpdc around the next 2 st's together (dec made)
With main color
Make a chain of 48, sl st to form a ring
Make a chain of 48, sl st to form a ring

Notes: the beginning ch 2 of each round is not counted as a st.
Round 1. Ch 2, work 1 dc in same space as sl st, work 1 dc in each ch st, sl st to top of beginning dc to join round (48 dc)

Notes: Try on your work, if it is too small repeat the above steps with a larger hook. This 1st round may also be a little loose, this is fine as we correct the tension later on in the pattern in the final steps.
Begin Pattern:
Round 2. Ch 2, work 1 dc in 1st dc, skip 2 dc's, work (2 dc, ch 2, 2 dc = shell made) in next dc, skip 2 dc's, *work 1 dc in next dc, skip 2 dc's, work (2 dc, ch 2, 2 dc = shell made ) in next dc, skip 2 dc's* repeat from *to* to end of round, sl st to top of beginning dc to join round

Join in contrasting color and work with contrasting on every odd row/every alternate row.

Round 3. Ch 2, work 1 fpdc around 1st dc, work 1 dc in same st that the shell st of the row below was made in, work (1 dc, ch 2, 1 dc = half shell) in the ch 2 space of the shell, work 1 dc in same st that the shell st of the row below was made in, *work 1 fpdc around the 1 dc, work (1 dc, ch 2, 1 dc = half shell) in the ch 2 space of the shell, work 1 dc in same st that the shell st of the row below was made in, * repeat from *to* to end of round, sl st to top of beginning fpdc to join round
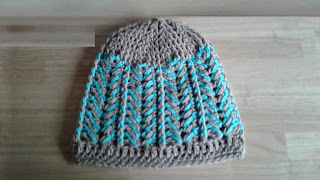
In the picture below, looking at the blue yarn only, there is 1 fpdc, followed by a completed herringbone, 1 fpdc and the beginning of the next herringbone

With main color.
Round 4. Ch 2, work 1 fpdc around 1st fpdc, work 1 dc in same st that the half shell st of the row below was made in,work (1 dc, ch 2, 1 dc = half shell) in the ch 2 space of the half shell, work 1 dc in same st that the half shell st of the row below was made in, *work 1 fpdc around the next fpdc, work (1 dc, ch 2, 1 dc = half shell) in the ch 2 space of the half shell, work 1 dc in same st that the half shell st of the row below was made in, * repeat from *to* to end of round, sl st to top of beginning fpdc to join round
Round 4. Ch 2, work 1 fpdc around 1st fpdc, work 1 dc in same st that the half shell st of the row below was made in,
Repeat round 4 until work measures approx 6 inches (about 14 rounds in total)


Working on crown with main color:
Round 1. Ch 2, work 1 fpdc around 1st fpdc, work 1 fpdc around each of the next 2 dc st's of the half shell, work 1 dc in the ch 2 space, work 1 fpdc around each of the next 2 dc st's of the half shell, *work 1 fpdc around the next fpdc, work 1 fpdc around each of the next 2 dc st's of the half shell, work 1 dc in the ch 2 space, work 1 fpdc around each of the next 2 dc st's of the half shell*, repeat from *to* to end of round, sl st to top of beginning fpdc to join round (48 st's)
Round 2. Ch 2, work 1 fpdc around 1st fpdc, work 1 fpdc around each st of the round, sl st to top of beginning fpdc to join round (48 fpdc's)
Begin decreases: Dec 5th and 6th st's tog
Round 3. Ch 2, work 1 fpdc around 1st fpdc, work 1 fpdc around each of the next 3 fpdc's, work 1 fpdc around the next 2 st's together (dec made), *work 1 fpdc around each of the next 4 fpdc's, work 1 fpdc around the next 2 st's together (dec made),* repeat from *to* to end of round, sl st to top of beginning fpdc to join round (40 st's)
Round 3. Ch 2, work 1 fpdc around 1st fpdc, work 1 fpdc around each of the next 3 fpdc's, work 1 fpdc around the next 2 st's together (dec made), *work 1 fpdc around each of the next 4 fpdc's, work 1 fpdc around the next 2 st's together (dec made),* repeat from *to* to end of round, sl st to top of beginning fpdc to join round (40 st's)
Dec 4th and 5th st's tog
Round 4. Ch 2, work 1 fpdc around 1st fpdc, work 1 fpdc around each of the next 2 fpdc's, work 1 fpdc around the next 2 st's together (dec made), *work 1 fpdc around each of the next 3 fpdc's, work 1 fpdc around the next 2 st's together (dec made),* repeat from *to* to end of round, sl st to top of beginning fpdc to join round (32 st's)
Dec 3rd and 4th st's tog
Round 5. Ch 2, work 1 fpdc around 1st fpdc, work 1 fpdc around the next fpdc, work 1 fpdc around the next 2 st's together (dec made), *work 1 fpdc around each of the next 2 fpdc's, work 1 fpdc around the next 2 st's together (dec made),* repeat from *to* to end of round, sl st to top of beginning fpdc to join round (24 st's)
Note: if you want a messy bun hat/pony tail hat, finish off yarn and sew in ends. Option 2. work 1 sc in each st around and sl st to join (thus giving a firmer ring)

Dec 2nd and 3rd st's tog
Round 6. Ch 2, work 1 fpdc around 1st fpdc, work 1 fpdc around the next 2 st's together (dec made), *work 1 fpdc around the next fpdc, work 1 fpdc around the next 2 st's together (dec made),* repeat from *to* to end of round, sl st to top of beginning fpdc to join round (16 st's)
Dec 1st and 2nd st's tog
Round 7. Ch 2, *work 1 fpdc around the next 2 st's together (dec made),* repeat from *to* to end of round, sl st to top of beginning fpdc to join round (8 st's), break off yarn leaving a long tail to sew remaining 8 st's closed.
Hat edge: please read both options, this will tighten your hat edge slightly and make it neater.
Version 1. Join main color with a sl st into any stitch, make a sc st into each st of the hat edge, sl st to 1st stitch to join round (48 sc)
Round 2. ch 1, work 1 sc into the back loop only of each sc of the round, sl st to 1st stitch to join round (48 sc). finish off and sew in ends.
Version 2. will give the hat more length. Repeat the above instructions with the hdc stitch instead of the sc stitch.
Round 7. Ch 2, *work 1 fpdc around the next 2 st's together (dec made),* repeat from *to* to end of round, sl st to top of beginning fpdc to join round (8 st's), break off yarn leaving a long tail to sew remaining 8 st's closed.

Version 1. Join main color with a sl st into any stitch, make a sc st into each st of the hat edge, sl st to 1st stitch to join round (48 sc)
Round 2. ch 1, work 1 sc into the back loop only of each sc of the round, sl st to 1st stitch to join round (48 sc). finish off and sew in ends.
Version 2. will give the hat more length. Repeat the above instructions with the hdc stitch instead of the sc stitch.
Free Pattern Courtesy Of Cathy Wood
Aka, Cats-Rockin-Crochet.
2017.
You can sell your items made from this free crochet pattern
I’d love to see this pattern used for charity use
Please link back to this pattern if you use it

Link to the Herringbone stitch on you tube.


