Showing posts with label Beanie-Babe. Show all posts

Monday, April 7, 2014

Baby Kisses-Crochet Baby Hat-Free Pattern


Introduction: This is a sweet little pattern for a boy or girl, and depending on which way you look at it, you can see an X shape or a Diamond shape, I can see the X shape and have therefore called the hat pattern, baby kisses xxx. The shape is formed by skipping a stitch, making 2 st's then coming back to work in the skipped st, the other half of the stitch is made similar, but you skip 2 st's, make a st, then come in from behind the st just made and make the 2 skipped st's, that way the elongated stitch stands out as a 3d effect and makes the X or the diamond.

Hook size: 4mm, US G/6
Yarn: 8 ply approx 50 gm’s US DK/Medium.
US crochet terms used
Skill level: beginner +
Tension: medium
Time: approx 1.5 hours
Stitches used:
Sl st = slip stitch
Ch = chain
Hdc = half double crochet
Dc  double crochet
Fpdc = front post dc
Bpdc = back post dc


Please note! The beginning ch 2 of every rnd is not counted as a st.
BEGIN:
Chain 4, sl st to first ch to form a ring. Or use a magic ring
Row 1, ch 2, work 10 dc into ring, to join, sl st into the 1st dc of this round, (you will join this way on every round)
(Increase in every st)
Row 2, ch 2, work 2 dc in same space as join, work 2 dc in each st to end of the round, to join, sl st into the 1st dc of this round (20 dc)
(Increase in every 2nd st)
Row 3, ch 2, work 1 dc in same space as join, work 2 dc in next dc, *work 1 dc in next dc, work 2 dc in next dc*, repeat from *to* to end, to join, sl st into the 1st dc of this round (30 dc)
(Increase in every 3rd st)
Row 4, ch 2, work 1 dc in same space as join, work 1 dc in next dc, work 2 dc in next dc, *work 1 dc in each of next 2 dc, work 2 dc in next dc*, repeat from *to* to end, to join, sl st into the 1st dc of this round (40 dc)
(Increase in every 4th st)
Row 5, ch 2, work 1 dc in same space as join, work 1 dc in next 2 dc, work 2 dc in next dc, *work 1 dc in each of next 3 dc, work 2 dc in next dc*, repeat from *to* to end, to join, sl st into the 1st dc of this round (50 dc) approx 13.5 inch circumference, new born size, stop increases and go onto row 7
(Increase in every 5th st)
Row 6,
ch 2, work 1 dc in same space as join, work 1 dc in next 3 dc, work 2 dc in next dc, *work 1 dc in each of next 4 dc, work 2 dc in next dc*, repeat from *to* to end, to join, sl st into the 1st dc of this round (60 dc) 3 to 6 month size, stop increases and go onto next row
Row 7, ch 2, work 1 dc in each dc to end, to join, sl st into the 1st dc of this round (new born,50 dc/60 dc 3 to 6 months)
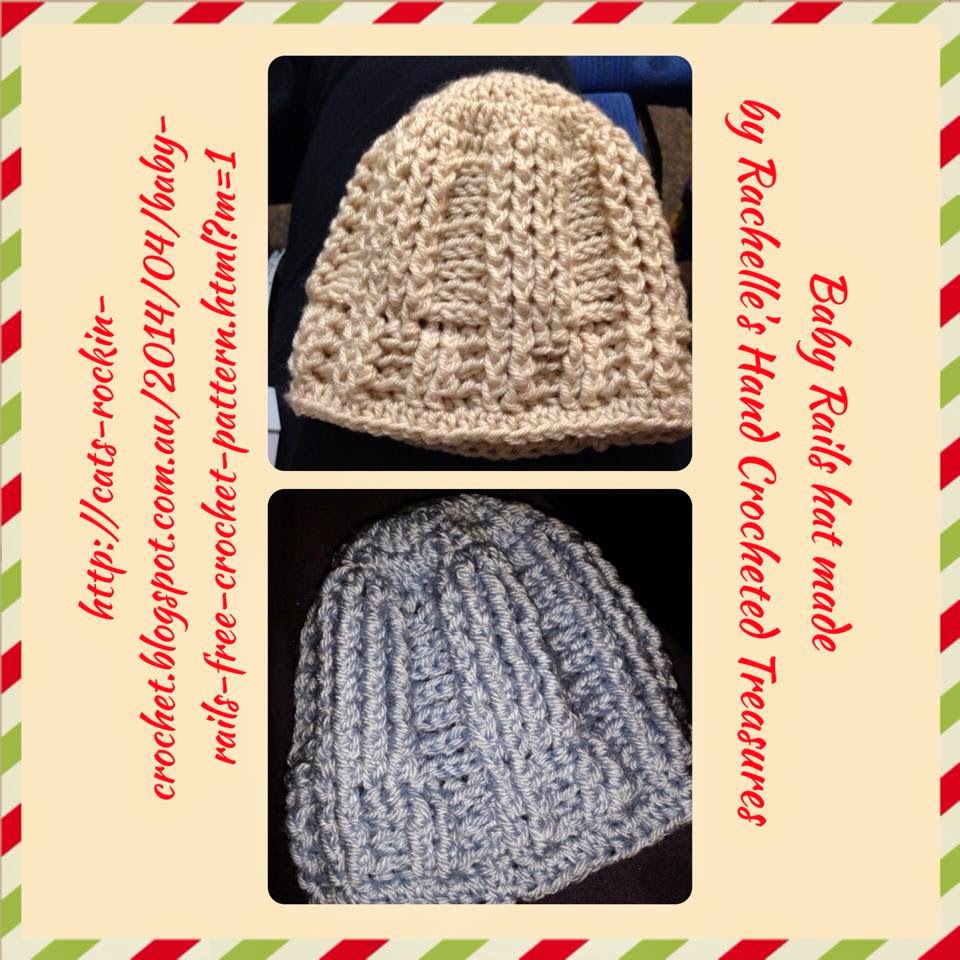
Pattern Rows: Row 1 and Row 2 form pattern, they are the reverse of each other, this will form an X shape or diamond shape pattern, depends on the way you look at it.
Row 1, ch 2, work 1 dc in same space as join, work 1 dc in each of next 3 dc, skip 1 dc, work 1 dc in each of the next 2 dc, work 1 dc in the skipped dc, skip 2 dc, work 1 dc in next dc, (now coming in from behind the dc just made and working into the skipped st's), work 1 dc into the 1st skipped dc, work 1 dc into the 2nd skipped dc, *work 1 dc in each of the next 4 dc, skip 1 dc, work 1 dc in each of next 2 dc, work 1 dc in the skipped dc, skip 2 dc, work 1 dc in next dc, (now coming in from behind the dc just made and working into the skipped st's), work 1 dc into the 1st skipped dc, work 1 dc into the 2nd skipped dc* repeat from *to* to end, to join, sl st into the 1st dc of this round (50 dc/60 dc)
Row 2, ch 2, work 1 dc in same space as join, work 1 dc in each of next 3 dc, skip 2 dc, work 1 dc in next dc, (now coming in from behind the dc just made and working into the skipped st's), work 1 dc into the 1st skipped dc, work 1 dc into the 2nd skipped dc, skip 1 dc, work 1 dc in each of next 2 dc, work 1 dc in the skipped dc, *work 1 dc in each of the next 4 dc, skip 2 dc, work 1 dc in next dc, (now coming in from behind the dc just made and working into the skipped st's), work 1 dc into the 1st skipped dc, work 1 dc into the 2nd skipped dc, skip 1 dc, work 1 dc in each of next 2 dc, work 1 dc in the skipped dc* repeat from *to* to end, to join, sl st into the 1st dc of this round (50 dc/60 dc)
You can end the pattern on row 1 or row 2

For newborn size, repeat pattern rows until hat measures approx 4.5 inches (approx 5 rows of pattern)
For 3 to 6 month size, repeat pattern rows until hat measures approx 5.5 inches (approx 6 rows of pattern)
Hat Edge: Both Sizes
Row 1, ch 2, work 1 dc in each dc to end, to join, sl st into the 1st dc of this round (50 dc/60 dc)
Row 2, ch 2, *work 1 fpdc around the next dc, work a bpdc around the next dc* repeat from *to* to end, to join, sl st into the top of the beginning fpdc of this round (50 dc/60 dc)

For newborn size, Row 3, ch 1, work 1 hdc in each st around, finish off and sew in ends
Row 3, repeat row 2

Row 4, ch 1, work 1 hdc in each st around, finish off and sew in ends 

Free Pattern Courtesy Of Cat Wood
2014.
You can sell your items made from this free crochet pattern
I’d love to see this pattern used for charity use
Please link back to this pattern if you use it
Google Google

Sunday, April 6, 2014

Easy Textured Hat Pattern-For baby


To fit 3 months. For newborn size use a 3.5 mm hook and make your hat length approx 4.5 inches prior to hat edge

cats rockin crochet

Introduction: This little hat was designed with the male child in mind, nothing too fancy, just a little texture and a very simple technique makes this the perfect recipe, for a quick and attractive hat for the little man in your life. A sc, ch, sc, is all that it takes! Once you are comfortable with the way the hat is made, it may be time for you to experiment with adding more colors, a fine way to use up left over yarn or co-ordinate colors to match a favorite outfit you have. cats rockin crochet

Hook size: 4mm, US G/6 
Yarn: 8 ply approx 50 gm’s US DK/Medium.
US crochet terms used
Skill level: beginner
Tension: medium
Time: approx 1.5 hours
Stitches used:
Sl st=slip stitch
Ch=chain
Sc = single crochet
Begin:
Ch 4 and sl st into 1st ch to form a circle, or make a magic ring
Rnd 1: ch 1, work 8 sc into ring, to join, sl st into the 1st sc of this round (8 sc)
Rnd 2: ch 1, work 2 sc in each sc to end, to join, sl st into the 1st sc of this round (16 sc)
Rnd 3: ch 1, work 1 sc in first sc, work 2 sc in next sc, *work 1 sc in next sc, work 2 sc in next sc* repeat from *to* to end, to join, sl st into the 1st sc of this round (24 sc)
Rnd 4: ch 1, *work 1 sc into each of the next 2 sc, work 2 sc in next sc* repeat from *to* to end,
to join, sl st into the 1st sc of this round (32 sc)
Row 5: ch 1, *work 1 sc into each of the next 3 sc, work 2 sc in the next sc* repeat from *to* to end, to join, sl st into the 1st sc of this round (40 sc)
Row 6: ch 1, *work 1 sc into each of the next 4 sc, work 2 sc in the next sc* repeat from *to* to end, to join, sl st into the 1st sc of this round (48 sc)
Rnd 7: ch 1, *work 1 sc into each of the next 5 sc, work 2 sc in the next sc* repeat from *to* to end, to join, sl st into the 1st sc of this round (56 sc) 13.5 inches head circumference
Rnd 8: ch 1, work 1 sc in each sc to end, to join, sl st into the 1st sc of this round (56 sc)
Rnd 9: ch 1, work (1 sc, ch 1, 1 sc) in 1st sc, skip the next sc, *work (1 sc, ch 1, 1 sc) in the next sc, skip the next sc* repeat from *to* to end, to join, sl st into the ch 1 space between the first 2 sc (56 sc)
Rnd 10: ch 1, work (1 sc, ch 1, 1 sc) in the next sc, *skip 1 sc work (1 sc, ch 1, 1 sc) in the next sc* repeat from *to* to end, to join, sl st into the ch 1 space between the first 2 sc (56 sc)
Continue with rnd 10 until work measures approx 5.5 inches in length, you must make a join into the very 1st sc of the round on your last row of the simple textured pattern


cats rockin crochet
Hat Edge: work a little loosely, or your hat edge will be too tight
Rnd 1, ch 1, work 1 sc into the very 1st sc, work 1 sc in each sc to end, to join, sl st into the 1st sc of this round (56 sc)

Repeat rnd 1, 3 to 4 more times (or continue for length desired), do not break off yarn if you are making the decorative band
cats rockin crochet
Optional:
Making the decorative band:
Row 1: ch 5, work 1 sc in 2nd ch from hook, work 1 sc in each of the next 3 ch, turn
Row 2: ch 1, work 1 sc in each of the next 4 sc, turn
Repeat row 2: 22 more times, (24 rows total), leave a tail for sewing the tag to the hat edge, begin sewing the 1st row of the tag, then straighten up your work and sew the last row to the hat edge, if you have enough yarn sew your tag in place, add a button on each end of the tag for decoration

cats rockin crochet

Free Pattern Courtesy Of Cat Wood
2014.
You can sell your items made from this free crochet pattern
I’d love to see this pattern used for charity use
Please link back to this pattern if you use it


Wednesday, April 2, 2014

Baby Rails- A Free Crochet Pattern


Introduction: I called this hat baby rails as it looks a little like train tracks, I first made one for my new born grandson Jack, I wanted a masculine looking hat for a boy, he looked so cute in his baby rails hat that I had to write the pattern for it. I love the look of the fpdc and bpdc together, wide or narrow gaps between each stitch give such a uniformed and neat look, I'm sure your little boy will look so smart in his baby rails hat. Free crochet pattern below.
To fit: 2 sizes, new born to 3 months, 3 to 9 months

Hook size: AU 4mm, US G/6
Yarn: AU 8 ply, US dk, approx 100 gms
US crochet terms used
Skill level: Beginner +
Tension: medium
Time: approx 2 hours
Stitches used:
ch = chain
hdc = half double crochet
dc = double crochet
fpdc = front post double crochet
bpdc = back post double crochet

Please note! The beginning ch 2 of every rnd is not counted as a st.
BEGIN:
Chain 4, sl st to first ch to form a ring. Or use a magic ring.
Row 1, ch 2, work 12 dc into ring, to join, sl st into the 1st dc of this round, (you will join this way on every round)
(Increase in every st)
Row 2, ch 2, work 2 dc into each dc to end, to join, sl st into the 1st dc of this round, (24 dc)
(Increase in every 2nd st)
Row 3, ch 2, work 1 dc in same place as join, work 2 dc into the next dc, *work 1 dc in next dc, work 2 dc into the next dc*, repeat from *to* to end, to join, sl st into the 1st dc of this round, (36 dc)
(Increase in every 3rd st)
Row 4, ch 2, work 1 dc in same place as join, work 1 dc into the next dc, work 2 dc into the next dc, * work 1 dc into each of the next 2 dc, work 2 dc into the next dc*,  repeat from *to* to end, to join, sl st into the 1st dc of this round, (48 dc) for new born to 3 months stop increases here and go onto the pattern approx 13.5 inch circumference
(Increase in every 4th st)
Row 5, ch 2, work 1 dc in same place as join, work 1 dc into each of the next 2 dc, work 2 dc into the next dc, * work 1 dc into each of the next 3 dc, work 2 dc into the next dc*,  repeat from *to* to end, to join, sl st into the 1st dc of this round, (60 dc) for 3 to 9 months stop increases, approx 15.5 inch circumference
Row 6, for size 3 to 6 months only, ch 2, work 2 dc in same place as join, *work 1 dc in each of next 14 dc, work 2 dc in next dc,* repeat from *to* 2 more times, work 1 dc in each of the next 14 dc, to join, sl st into the 1st dc of this round, (64 dc)


Pattern Row. The pattern is an 8 st count that needs to be multiplied by an even number, for the look desired.
the ch 2 is not counted as a st
Row 1, ch 2,(do not work into the ch 2 of the previous row) *work 1 fpdc around each of the next 4 dc, work 1 bpdc around each of the next 4 dc* repeat from *to* to end, to join, sl st into the top of the 1st fpdc of this round
Row 2, ch 2,(do not work into the ch 2 of the previous row) *work 1 fpdc around each of the next 4 fpdc, work 1 bpdc around each of the next 4 bpdc* repeat from *to* to end, to join, sl st into the top of the 1st fpdc of this round.
For newborn to 3 month size, repeat row 2 until your hat measures approx 4.5 inches in length, then continue onto the rib edging
For 3 to 9 months size, repeat row 2 until your hat measures approx 5.5 inches in length, then continue onto the rib edging
Rib Edging
Row 1, ch 2, work 1 fpdc around each of the next 2 st's, work 1 bpdc around each of the next 2 st's* repeat from *to* to end, to join, sl st into the top of the 1st fpdc of this round.
Row 2, to row 3, repeat row 1 of rib edging (or continue for length desired)
Row 4, ch 1, work 1 hdc in each st to end, to join, sl st into the top of the 1st hdc of this round, finish off and sew in ends


 Rachelle Herron, say's
"Loving this pattern from Cathy Wood at Cats Rockin Crochet. It is quick and easy and has awesome texture. I used some leftover Panda soft I had"

Rachelle has done it again!
Why not team the baby rails hat pattern with the one piece bootie pattern, they look fantastic together! Thank you Rachelle.

Free Pattern Courtesy Of Cat Wood
2014.
You can sell your items made from this free crochet pattern
I’d love to see this pattern used for charity use
Please link back to this pattern if you use it

Monday, March 10, 2014

The Baby Chain-Baby Hat-Free Crochet Pattern


The Baby Chain
A Free Crochet Pattern
Introduction: A small cable st is worked onto a flat strip of crochet, that flat strip is then joined to become circular, the edge and crown of the hat are then worked onto either side of the circle forming a nice little decorative hat, suitable for a boy or girl
To fit: Newborn
Hat height: approx 5 inches
Head circumference: approx 13 inches
Materials list:
Hook size: 3.5mm to 4.00mm US G/6
Yarn: 8 ply approx 50 gm’s US DK/Medium
Sewing needle
US crochet terms used
Skill level: beginner+
Tension: medium
Time: approx 2 hours
Stitches used:
Sl st=slip stitch
Ch=chain
Hdc = half double crochet
Fphdc = front post hdc
Dc = double crochet
Fpdc = front post dc
Bpdc = back post dc
Fptrbl = front post trbl
Dec = decrease
Hdc decrease over 2 st’s = yo hook, insert hook into the 1st st and pull up a loop, (3 loops on hook), insert hook into next st and pull up a loop (4 loops on hook),  yo over hook, pull through all 4 loops on hook
Cable Stitch = worked over 4 st’s, skip 3 st’s work a fptrbl in 4th, work a fptrbl in 3rd skipped st, work a fptrbl in 1st  skipped st, work a fptrbl in 2nd skipped st
Please note! The beginning ch 2 of every rnd is not counted as a st.

Row 1, ch 12, work 1 dc in 2nd ch from hook, work 1 dc in each chain to end, ch 2 and turn (10 dc, 2 ch)
Row 2, work 1 dc in each of the next 3 dc, work  a cable stitch over the next 4 dc, work 1 dc in each of next 3 dc, ch 2 and turn
Row 3, work 1 dc in each of the next 3 dc, work 1 bpdc over next 4 st’s, work 1 dc in each of next 3 dc, ch 2 and turn
Row 4, work 1 dc in each of the next 3 dc, work 1 fpdc over next 4 st’s, work 1 dc in each of next 3 dc, ch 2 and turn
Row 5, repeat row 3
Row 6, repeat row 2
Row 7, repeat row 4
Repeat rows 4 to 7, 6 more times, you will have a total of 31 rows, fold in half and sl st to join, the beginning and final rows together
You will now be joining in yarn and working st’s into the side edges of the 31 rows, making the hat edge first
Row 1, make the sl st around the bar closest to where you joined your cable piece, ch 1, work 1 hdc in same space as sl st, work 2 hdc in next row end space, *work 1 hdc in next row end space, work 2 hdc in next row end space* repeat from *to* to end, sl st to join in the beginning hdc of the round, (46 hdc)
Row 2, ch 1, work 1 hdc in each hdc to end, sl st to join in the beginning hdc of the round
Row 3, ch 1, work 1 hdc in 1st hdc, work 1 fphdc around next hdc, *work 1 hdc in next hdc, work 1 fphdc around next hdc* repeat from *to* to end, sl st to join in the beginning hdc of the round
Row 4, repeat row 3
Row 5, repeat row 2, finish off and leave a tail for sewing in end
You are now working on the top part of the hat
Row 1, repeat row 1 of hat edge (46 hdc)
Row 2, repeat row 2 of hat edge, but make an increase of 2 hdc’s anywhere in this round (48 hdc)
Row 3 and Row 4, repeat row 2
Decreases will now be made for the crown
Decrease in every 5th st.
Row 5, ch 1, *work 1 hdc in each of next 4 hdc, work a hdc dec over the next 2 hdc* repeat from *to* to end, sl st to join in the beginning hdc of the round
Decrease in every 4th stitch
Row 6, ch 1, *work 1 hdc in each of next 3 hdc, work a hdc dec over the next 2 hdc* repeat from *to* to end, sl st to join in the beginning hdc of the round
Decrease in every 3rd stitch
Row 7, ch 1, *work 1 hdc in each of next 2 hdc, work a hdc dec over the next 2 hdc* repeat from *to* to end, sl st to join in the beginning hdc of the round
Decrease in every 2nd stitch
Row 8, ch 1, *work 1 hdc in next hdc, work a hdc dec over the next 2 hdc* repeat from *to* to end, sl st to join in the beginning hdc of the round
Decrease in every stitch
Row 9, ch 1, *work a hdc dec over the next 2 hdc*, repeat from *to* to end, finish off and leave a tail for weaving through final round of stitches and sew in tail, sew in all loose ends

Free Pattern Courtesy Of Cat Wood
Aka, Cats-Rockin-Crochet.
 2014.
You can sell your items made from this free crochet pattern
I’d love to see this pattern used for charity
Please link back to this pattern if you use it

Friday, February 21, 2014

Spring Breeze-Baby Beanie Hat-Free Crochet Pattern


 Spring Breeze-Baby Beanie Hat
free crochet pattern
free crochet

For those who are looking for the Shy Butterfly Hat, free crochet pattern

Introduction: Easier than it looks! The little petals are made over 2 rows, with a simple dc row that separates each row of petals. If you can make a ch, dc and understand a cluster stitch, you can make this. There are 2 types of cluster st used in this pattern, the first is for the side way petal and the second for the top petals. I have never made a cluster over 3 st’s, however that is how the bottom cluster works, the top petals are 3 dc’s made  into the same space and the side way petal are made in the 1st ch of a ch 4 with only 2 clusters. You could also use this pattern as a christening hat, because just quietly the petals also look like a bit like a little cross.


free crochet pattern


To fit: Newborn +

Measurements approx: Head Circumference 13 inches, hat height approx 5.5 inches


Please note, by using a smaller or larger hook, you can make a smaller or larger beanie


Hook size: 4mm, US G/6

Yarn: 8 ply approx 50 gm’s US DK/Medium.

US crochet terms used

Skill level: beginner ++

Tension: medium

Time: approx 2 hours


Stitches used:

Sl st=slip stitch

Ch=chain

Sc = single crochet

Hdc= half double crochet

Dc =double crochet

Fphdc = front post half double crochet

Cluster 2 = 2 dc cluster

Cluster 3 st’s = cluster over 3 st’s


Cluster 2 explanation (side way petal): yo, insert hook into st, pull up a loop, yo pull through pull through 2 (2 loops on hook), yo insert hook in same st, pull up a loop, yo pull through 2 loops, (3 loops on hook), yo pull through all loops on hook (finished)


Please read carefully, we are making a 3 dc cluster over 3 st’s

Cluster 3 st’s explanation: yo, insert hook into 1st st, pull up a loop, yo pull through 2 loops, (2 loops on hook), yo insert hook into 2nd st, pull up a loop, yo pull through 2 loops, (3 loops on hook), yo, insert hook into 3rd st, pull up a loop, yo pull through 2 loops (4 loops on hook), yo pull through all loops (finished)


12 dc crown


Please note! The beginning ch 2 of every rnd is not counted as a st.


BEGIN:

Chain 4, sl st to first ch to form a ring. Or use a magic ring.

Row 1, ch 2, work 12 dc into ring, to join, sl st into the 1st dc of this round, (you will join this way on every round)


(Increase in every st)

Row 2, ch 2, work 2 dc into each dc to end, sl st to join (24 dc)

(Increase in every 2nd st)
 
Row 3, ch 2, work 1 dc in same place as join, work 2 dc into the next dc, *work 1 dc in next dc, work 2 dc into the next dc*, repeat from *to* to end, sl st to join (36 dc)
(Increase in every 3rd st)


Row 4, ch 1, work 1 dc in same place as join, work 1 dc into the next dc, work 2 dc into the next dc, * work 1 dc into each of the next 2 dc, work 2 dc into the next dc*,  repeat from *to* to end, sl st to join (48 dc)

(Increase in every 4th st)

Row 5, ch 1, work 1 dc in same place as join, work 1 dc into each of the next 2 dc, work 2 dc into the next dc, * work 1 dc into each of the next 3 dc, work 2 dc into the next dc*,  repeat from *to* to end, sl st to join (60 dc)


Begin pattern rows:


Row 6, ch 2, work a cluster 3 st beginning in same place as the ch 2, ch 4, work a cluster 2 in the 1st ch of the ch 4, skip 1 st, *work a cluster 3 st over next 3 st’s, ch 4, work a cluster 2 in the 1st ch of the ch 4, skip 1 st*, repeat from *to* to end, sl st into the top of the 1st cluster c st of this round (12 flowers)


Row 7, ch 2, work 3 dc in same space as join, ch 2, *work 3 dc into the top of the next cluster 3 st, ch 2*, repeat from *to* to end, to join, sl st into the beginning dc of this round


Row 8, ch 2, work 1 dc in same space as join, work 1 dc in each of next 2 dc, work 1 dc in ch 2 space, *work 1 dc in each of the next 3 dc, work 1 dc in ch 2 space* repeat from *to* to end, to join, sl st into the beginning dc of this round (60 dc)


Repeat pattern rows 6, 7 and 8, 1 more time, then repeat rows 6 to 7, 1 more time


Hat edge: Made with the hdc and fphdc: Beginning ch 1 is not counted as a stitch.

Row 1, Ch 1, work 1 hdc in same space as join, work 1 fphdc around the next dc, work 1 hdc in next dc, work 1 hdc in next ch space, * work 1 hdc in next dc, work 1 fphdc around next dc, work 1 hdc in next dc, work 1 hdc in next ch space*, repeat from *to* to end, to join, sl st into the beginning hdc of this round. Finish off and tie in ends, or continue row 1 of hat edge for length desired


Free Crochet Pattern Courtesy Of Cat Wood

Aka, Cats-Rockin-Crochet.

 Feb 2014.


You can use this free crochet pattern for charity or for selling your work, please link back to this pattern if you use it.